Auction: 19002 - Orders, Decorations and Medals
Lot: 89
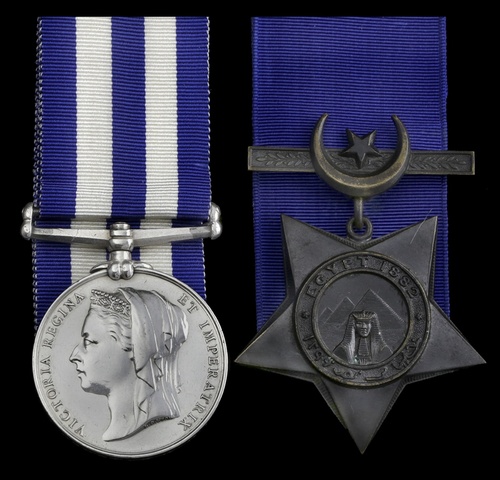
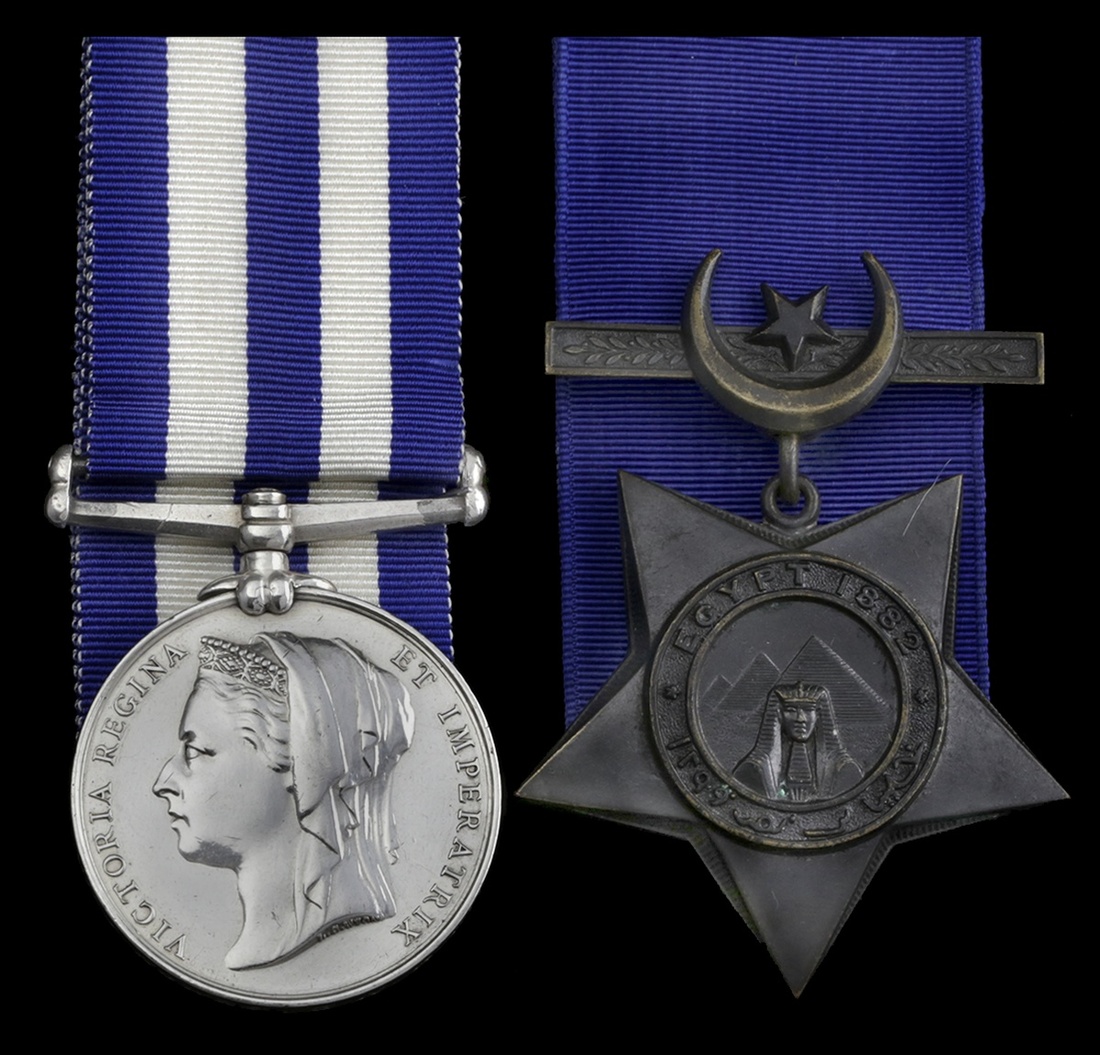
(x) A rare Egypt and Sudan pair awarded to Private S. Howes, King's Royal Rifle Corps, who was killed in action on 5 August 1882 during the Battle of Kafr Ed-Dauar
Egypt and Sudan 1882-89, dated reverse, no clasp (1588. Pte. J. Howes. 3/K.R. Rif: C.); Khedive's Star 1882, unnamed as issued, note first initial, very fine (2)
One of 4 men killed, in addition to 27 wounded (Report of the British Naval and Military Operations in Egypt, 1882, refers).
Solomon Howes served with the 3rd Battalion, King's Royal Rifle Corps, as part of the 1,000-strong left hand column under Lieutenant-Colonel Thackwell. Fighting alongside half Battalions of the South Staffordshire Regiment and the Duke of Cornwall's Light Infantry, together with two 9-pounder naval guns and detachments of mounted infantry, the Riflemen advanced along the banks of the Mahmoudiyah Canal. The right hand column, under the personal direction of Alison, of similar strength and composed of men of the Royal Marine Artillery and Royal Marine Light Infantry, together with an armoured train and two 9-pounder naval guns, advanced along the Cairo railway line, roughly parallel to the first column. Their objective was clear; to launch a probing attack towards 'Urabi's trenches, ascertain the strength of the position and test local rumours that the Egyptians were retreating.
As the left column advanced down both banks of the Canal, leading units of Mounted Infantry on the eastern bank rode ahead to reconnoitre. Chancing upon a large body of Egyptians who immediately opened fire, Lieutenant Vyse was shot from his mount and fell to the ground. Private Frederick Corbett - a fellow Rifleman - stepped forward and attempted to staunch the bleeding of the officer's wounds whilst under a constant fire. This killed another man and wounded 2 others - but to no avail - Vyse had been shot through the femoral artery and bled to death in ten minutes. Corbett was awarded the Victoria Cross for his actions.
On the west bank of the canal, likely including Solomon, troops faced a large number of Egyptian troops occupying a ditch running across their front, behind which was a thick covering of bush. Advancing in skirmish order using fire and movement tactics to draw closer to the enemy, the men made steady progress - ably assisted by the 9-pounder which kept pace with them along the canal towpath, firing the occasional shrapnel shell in support. The War in Egypt and the Soudan takes up the story:
'When the Rifles got to within 100 yards of the ditch, Egyptians could already be seen creeping off in twos and threes into the bush behind their position. When the order was given for the Rifles to fix bayonets and charge, the remaining defenders took flight, many throwing away their arms in the process.'
At this point, the British left wing was ordered to halt by Thackwell. Believing his men to have reached their objective - a white house on the canal bank which marked the closest point of the canal to the railway line - his men stopped the advance and waited for further instructions. They were oblivious to the presence of another white house, the 'true' objective, a mile further ahead, the mistake would have serious consequences for the other British column.
The right wing came into position by rail with the armoured train and its 40-pounder leading the assault, the Marines riding in a second train behind. Just beyond Mahalla Junction the railway line was broken forcing the troops to disembark under the cover of the railway embankment. Having initially trained their artillery on the broken part of track, the Egyptian artillery shifted its focus to the armoured train - with limited success - as the British retaliated and quickly silenced the enemy batteries.
At this point, as the Marines drew ahead of the halted left hand column, they began to take fire on their left flank from Egyptian soldiers posted along the banks of the canal. Recognising their predicament, in particular the absence of cover from rifle fire and lack of support, the Marines charged across the intervening ground, firing a volley into the Egyptian front line before closing with fixed bayonets. The Egyptians 'fled in all directions, many being shot down or drowning in the canal as they attempted to reach safety.' (Ibid)
Now deployed in a diagonal line across both the canal and the railway, the British maintained a fierce fight with the enemy, Alison taking the opportunity to survey the Egyptian fortifications for later attacks. At about 6.45 p.m., with the light failing and Egyptian reinforcements appearing on the horizon, a general withdrawal was ordered. This was carried out with 'great coolness and precision' (Recent British Battles on Land and Sea, refers). By 8 p.m. all were out of action.
The engagement resulted in British casualties of one officer and three men killed and 27 wounded, 24 of whom being from the right hand column. Egyptian casualties vary, but are estimated at 200 by William Wright in A Tidy Little War: The British Invasion of Egypt. In London, The Times reported that 'the result is felt by all concerned to be satisfactory'. U.S. Military observer Caspar Goodrich, in a position to take a less partisan view, noted:
'Beyond the moral effect on the attacking force of a successful brush with the enemy, the reconnaissance in force was barren of results. The strength of the Egyptians was neither developed nor ascertained, nor was the position held from which they were driven. The balance of advantages seems to be negative (for the British); valuable lives were sacrificed, and the enemy regained the ground he had lost without suffering severely enough to be seriously affected.'
Subject to 5% tax on Hammer Price in addition to 20% VAT on Buyer’s Premium.
Sold for
£550
Starting price
£420

Watch, listen and bid as if you were in the room. Now available for auctions worldwide.
Click here to bid live
An exclusive and confidential service for the discerning collector or vendor.
View the Gallery
Download every Spink catalogue on your iPad, iPod or iPhone using free Spink app.
Download From iTunes© 2026 Spink & Son. All rights reserved.